
What You'll Create
In this guide, you will create a short background music candidate with VMAI AI Music Generator.
By the end, you will be able to:
- choose model quality for a quick preview;
- use Create mode for instrumental background music;
- write a music prompt within the 500-character limit;
- choose Auto or Manual duration;
- tune genre, mood, BPM, key, and time signature;
- check Credits and sign-in requirements before generating;
- review, play, and download the result when it is ready.
Before You Start
What you need
- The approximate length and mood of the video that needs background music.
- A VMAI account. The music generation start API verifies a signed-in user.
- Credits for generation. Check the estimate and remaining balance on the page.
- A short first prompt. The music description field accepts up to 500 characters.
When should you use this tool?
| Situation | Recommended approach |
|---|---|
| You need calm music behind a product demo | Generate instrumental music designed to stay low under narration. |
| You need a short mood for a short-form intro | Try a short manual duration or loop workflow. |
| You want to compare several moods quickly | Use Lite or Standard for multiple candidates. |
| You want to transform existing audio | Use Cover or Repaint only after checking reference-audio rights. |
Step 1: Open AI Music Generator
Open AI Music Generator.
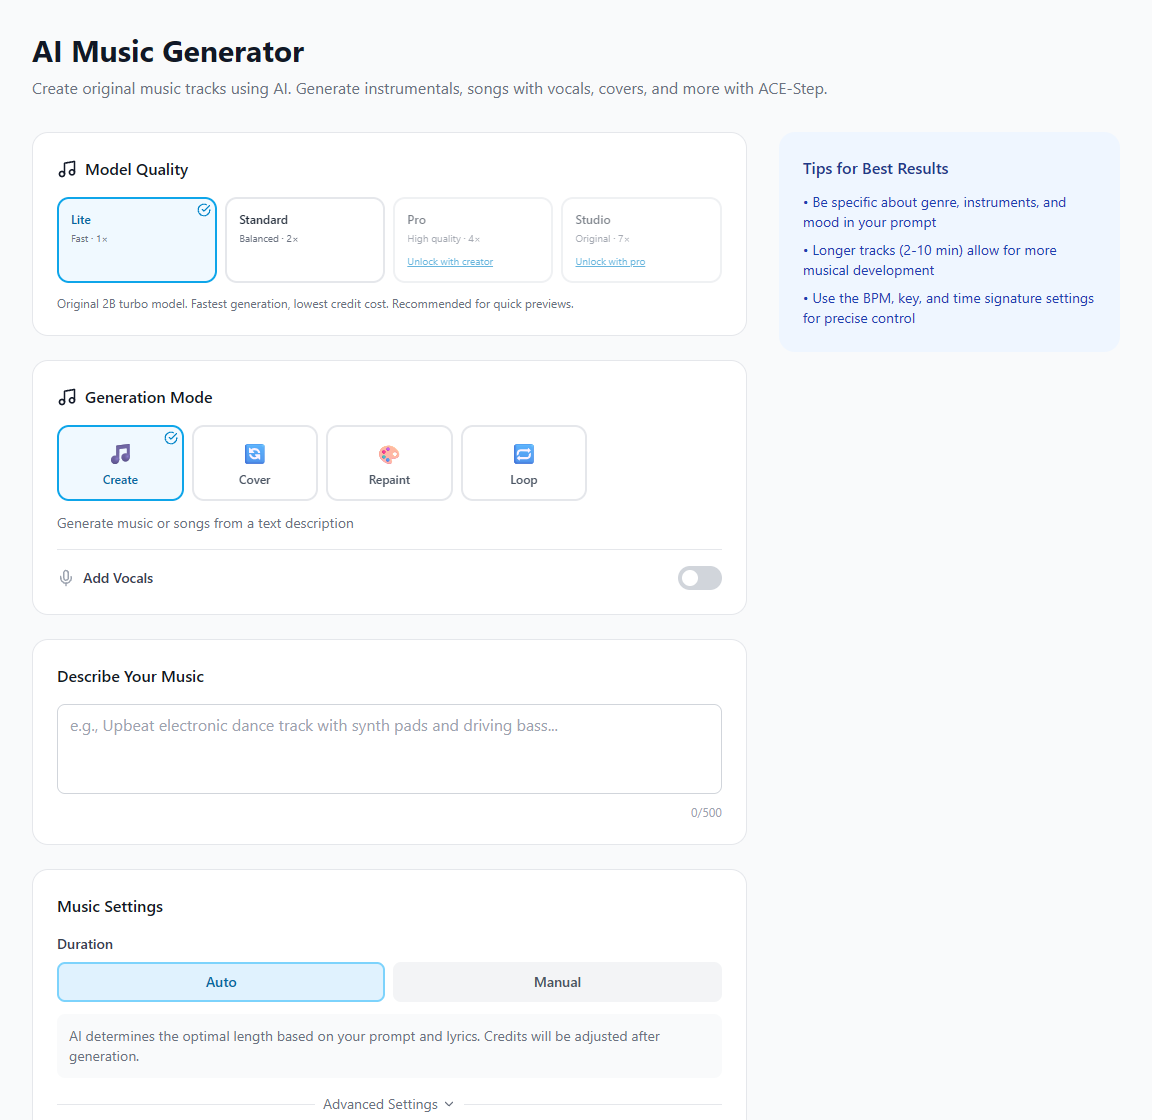
AI Music Generator screen: choose model quality, generation mode, music description, and duration settings in one flow.
It helps to read the page in four sections.
| Area | What it does |
|---|---|
| Model Quality | Choose Lite, Standard, Pro, or Studio with different quality and Credit multipliers. |
| Generation Mode | Choose Create, Cover, Repaint, or Loop. |
| Describe Your Music | Write the scene, genre, instruments, and mood. |
| Music Settings | Set duration, advanced music constraints, and Credit information. |
Do not try to create the final track immediately. Treat the first pass as a 10–30 second direction check.
Step 2: Start with preview-friendly model quality
At the top, choose Model Quality.
For the first test, Lite or Standard is usually enough. Lite is the fastest, lowest-Credit preview option. Standard is useful when you want a candidate closer to the final sound. Pro and Studio target higher quality, but they also have plan requirements and higher multipliers.
| Model | UI description | Use it first when |
|---|---|---|
| Lite | Fast · 1× | You only need to test genre and mood. |
| Standard | Balanced · 2× | You want a more realistic candidate without going all in. |
| Pro | High quality · 4× | You are refining a final candidate for prompt adherence and audio quality. |
| Studio | Original · 7× | You need the highest-quality candidate and can accept longer generation time. |
Step 3: Use Create mode for background music
For new background music, choose Create mode. This mode generates music or songs from a text description.
In this tutorial, keep Add Vocals off because the goal is music behind narration. Turning vocals on opens the lyrics workflow and changes the generation into a song with AI vocals. For background music, instrumental is simpler and safer.
Understand the other modes like this.
| Mode | Use case | What else you need |
|---|---|---|
| Create | Generate new music from a prompt | Music prompt |
| Cover | Make a cover from reference audio | Reference audio you have the right to use |
| Repaint | Transform the style of existing audio | Reference audio you have the right to use |
| Loop | Create loopable music | A target loop length and mood |
Cover and Repaint require reference audio. If you are using team or client files, check permission before uploading.
Step 4: Write the music prompt
Enter the background music direction in Describe Your Music. The current UI limits the prompt to 500 characters.
A useful prompt includes four things.
- Video context: where the track will be used.
- Mood: calm, bright, tense, cinematic, playful, and so on.
- Instruments or texture: piano, synth pads, drums, strings.
- What to avoid: no vocals, no heavy drums, not too dramatic.
Example:
textCalm background music for a product tutorial, soft synth pads, light percussion, not too fast, no vocals, bright and stable mood that does not compete with narration.
You can also test a Korean prompt:
text차분한 제품 튜토리얼 뒤에 깔 배경음악. 부드러운 신스 패드와 가벼운 퍼커션, 너무 빠르지 않은 템포, 보컬 없음, 설명 음성을 방해하지 않는 밝고 안정적인 분위기.
Step 5: Choose Auto or Manual duration
In Music Settings, choose duration.
Use Auto when you are still exploring. Auto lets AI decide the length based on the prompt and lyrics, then adjusts Credits after generation.
Use Manual when the video length is already known. For a 30-second short, generate near 30 seconds. For a 60-second product demo, start near 60 seconds. Manual duration caps depend on model quality.
| Situation | Duration approach |
|---|---|
| Direction check | Auto or a short manual duration |
| Shorts and reels | Generate slightly longer than the edit, then trim |
| Tutorial | Generate several short scene-based candidates |
| Repeating background | Consider Loop mode and the repeat point |
Longer tracks take more time and make candidate comparison more expensive. Start short, then make the final candidate longer.
Step 6: Narrow the result with advanced settings
Open Advanced Settings to tune genre, mood, BPM, key, and time signature.
You do not need to fill every field. If the result is too broad, lock one or two settings at a time.
| Setting | When to use it |
|---|---|
| Genre | You know the direction, such as lo-fi, cinematic, or electronic. |
| Mood | You need a clearer emotional target, such as calm, uplifting, or epic. |
| BPM | The track needs to match the pace of cuts or motion. |
| Key | You need consistency with a brand sound or another track. |
| Time signature | The rhythm matters, such as 3/4 or 6/8. |
If vocals are enabled, also review vocal style and vocal language. For this background-music workflow, keep vocals off and start by tuning genre, mood, and BPM only.
Step 7: Check Credits, then generate
Review Credit Info before generating.
If you are signed out, the page shows that login is required. When signed in, the page shows available Credits, rate per 30 seconds, and estimated total. The estimate changes with model quality, mode, and duration.
Before clicking generate, check this list.
- Add Vocals is off.
- The prompt is under 500 characters.
- Auto or Manual duration matches the video goal.
- Model quality and multiplier are appropriate.
- If using Cover or Repaint, reference-audio rights are clear.
- Estimated Credits and available Credits have been checked.
When ready, click Generate Music. The page shows progress while the track is being created, then lets you play the result.
Step 8: Review the result like an editor
When the result is ready, do not ask only “Is this good music?” Ask “Does this fit the edit?”
| Check | How to test |
|---|---|
| Narration conflict | Play it under the voiceover. |
| Length | Check the intro, ending, and cut points. |
| Repetition | Listen for loops becoming obvious too soon. |
| Mood | Make sure the music does not overpower the message. |
| Reuse | Save notes if it could become a repeatable brand sound. |
Download the track you like, and save the prompt and settings with it. If you keep only the audio file, it will be harder to recreate the same mood later.
Next steps
After creating a background music candidate, you can continue with these workflows.
- To create the full video, start from New Video with your idea or script.
- If you also need narration, read Create a Voiceover with AI TTS Voice Generator.
- To decide what to check before generation, read Before You Generate AI Music: 6 Decisions That Matter More Than the Prompt.
Tutorial Complete!
You've read this tutorial. Move on to the next step.
Found this tutorial helpful?
Subscribe to get notified when we publish new tutorials and guides. No spam, unsubscribe anytime.
Comments
Please login to leave a comment
LoginNo comments yet. Be the first to comment!