
What You'll Create
In this tutorial, you will use VMAI Subtitle Style Editor to design a caption style before uploading or rendering a real video.
By the end, you will be able to:
- open Subtitle Style Editor and choose a base style;
- adjust highlight color, position, and font size;
- preview readability with Korean and English sample text;
- copy the generated
caption_styleJSON; - save a style preset when signed in;
- reuse the style in Subtitle Burner and check timing, Credits, and preview before rendering.
Before You Start
What you need
- A VMAI account if you want to save and reload presets.
- A rough idea of the video mood: lesson, short-form clip, product demo, webinar, or brand clip.
- A subtitle file or AI-generated subtitles later. This tutorial focuses on designing the style first.
When should you use this tool?
Subtitle Style Editor is useful when you want to answer “which caption style fits this video?” before spending render time.
| Situation | Why it helps |
|---|---|
| You need a brand caption style | Test color and placement before rendering. |
| You reuse styles across videos | Save a preset instead of rebuilding the same settings. |
| You want to check readability first | Compare sample text quickly without uploading a video. |
| Your workflow accepts JSON settings | Copy the caption_style JSON for reuse. |
Step 1: Open Subtitle Style Editor
Open Subtitle Style Editor.
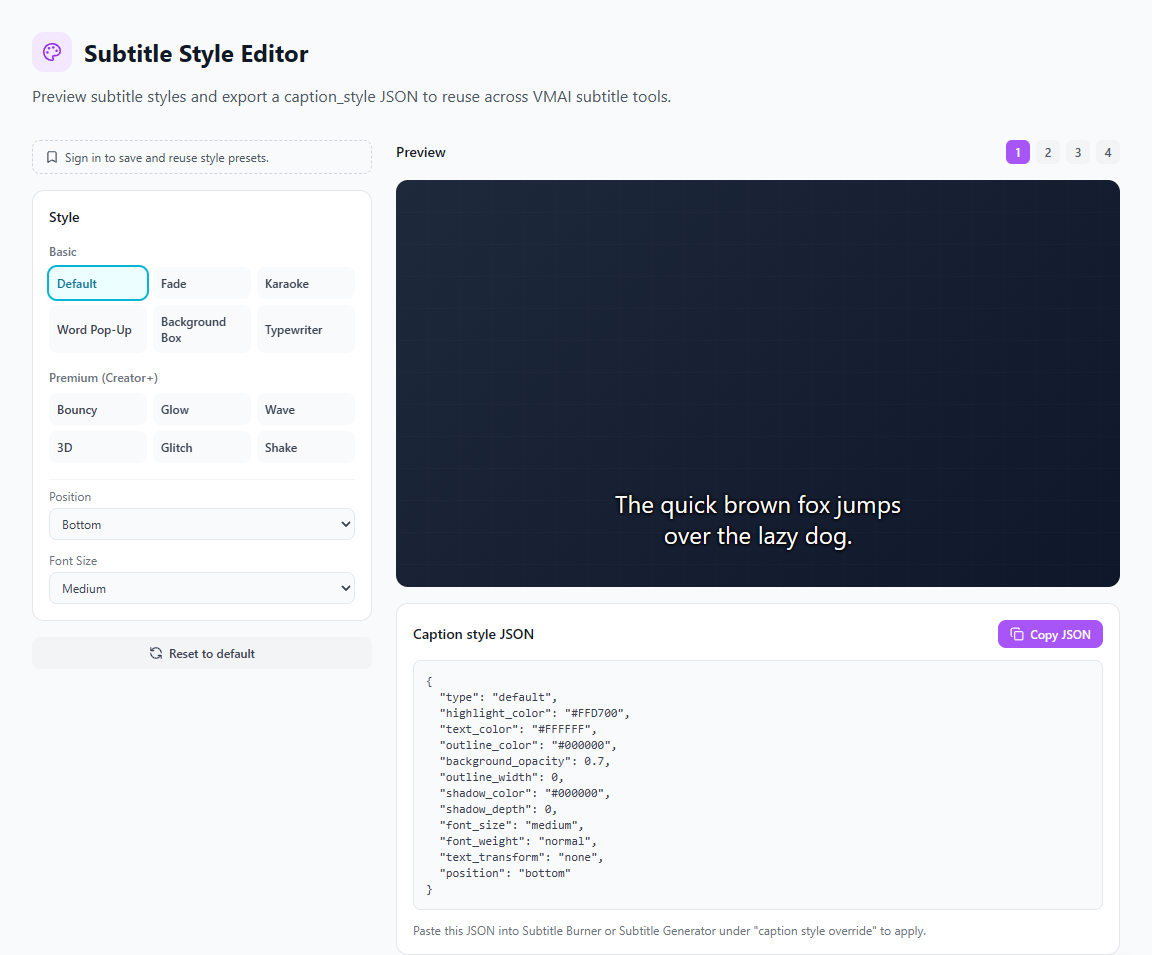
Subtitle Style Editor screen: choose style and position on the left, then check the preview and caption_style JSON on the right.
The page has two main areas.
| Area | What it does |
|---|---|
| Left settings panel | Choose presets, style groups, colors, position, and font size. |
| Right preview panel | Preview the caption on a sample frame and copy the JSON settings. |
You do not need to upload a video first. Use the editor to compare style candidates, then apply the winning style in the real subtitle workflow.
Step 2: Choose a base style first
Do not start with the flashiest animation. Start with the style that fits the video purpose.
The style panel groups styles into basic and premium-style options. The current catalog includes this flow.
| Group | Example styles | Good for |
|---|---|---|
| Basic | Default, Fade, Karaoke, Word Pop-Up, Background Box, Typewriter | Lessons, tutorials, general explanations, short emphasis moments |
| Premium | Bouncy, Glow, Wave, 3D, Glitch, Shake | Shorts, hooks, brand clips, moments that need motion |
Step 3: Adjust color, position, and font size
After choosing a style, review three basic settings.
Highlight color
Styles such as Karaoke, Word Pop-Up, and Background Box use highlight color heavily. Before choosing a brand color, make sure it stays readable on both bright and dark frames.
Position
You can choose bottom, center, or top.
- For explanation videos, bottom is usually safe.
- For screen recordings, try top if the bottom covers controls or timelines.
- For vertical videos, check that captions do not collide with app UI or comments.
Font size
The font-size flow supports small, medium, and large. Medium or large may be safer for mobile viewing, but overly large captions can cover product screens or multi-line subtitles.
Step 4: Preview with sample text
The preview panel lets you switch between sample sentences. The current implementation includes both English and Korean samples, which helps you compare line length and density across multilingual subtitles.
While previewing, check:
- Does one line look too long?
- Are Korean and English both readable at the same size?
- Do outlines or boxes still work on brighter backgrounds?
- Does top or center placement cover the thing viewers need to see?
- Is the accent color too intense for longer sentences?
Step 5: Copy JSON or save a preset
When the style feels right, reuse it in one of two ways.
Option A: Copy the caption_style JSON
Use the Caption style JSON area to review and copy the current settings.
This JSON is useful for development, operations, or VMAI subtitle workflows that accept caption style overrides. It is also a good way to document a team style standard.
Option B: Save a preset
Signed-in users can save the current style as a preset.
- Enter a preset name.
- Save the current style.
- Select the preset in a later workflow.
- Delete presets you no longer use.
In the current code, preset names must be 1–60 characters, each user can store up to 50 presets, and duplicate names are rejected.
Step 6: Apply it in Subtitle Burner
Once you have a candidate style, apply it to a real video in Subtitle Burner.
The basic flow is:
- Upload your video file.
- Upload an SRT/VTT file or generate subtitles in the AI tab.
- Load your saved preset or choose the same style settings.
- Use the preview to check position and size.
- Check estimated Credits and available Credits.
- Start rendering only when the sample looks safe.
Word-by-word animation styles need good word timing. Subtitle Burner is designed to warn when a word-timing style is selected but the current subtitle source does not include word timing. If you only have an SRT file, consider generating subtitles with word timing before using karaoke or word-pop effects.
Final checklist
Before rendering, confirm:
- Captions do not cover key information, buttons, faces, or product screens.
- The style is readable on a small screen.
- Korean and English samples both look natural.
- Word-by-word animation was tested with word-timed subtitles.
- Estimated Credits and available Credits were checked.
- Reusable styles were saved as presets.
- A short sample was tested before a long render.
Next step
After choosing a style, apply it to a real video.
- If you do not have subtitles yet, create them with AI Subtitle Generator & Editor.
- To burn captions into the final video, use Subtitle Burner.
- If you want the decision framework first, read 7 Checks Before You Choose a Subtitle Style.
Tutorial Complete!
You've read this tutorial. Move on to the next step.
Found this tutorial helpful?
Subscribe to get notified when we publish new tutorials and guides. No spam, unsubscribe anytime.
Comments
Please login to leave a comment
LoginNo comments yet. Be the first to comment!