

What You'll Create
In this guide, you will use VMAI AI Subtitle Generator & Editor to create an SRT or VTT subtitle file from audio or video.
By the end, you will be able to:
- upload an audio or video file;
- choose SRT or VTT output;
- review speech recognition language, VAD, AI subtitle refinement, and subtitle formatting settings;
- check estimated Credits before generation;
- review the generated subtitles in the editor;
- download the subtitle file or continue to the next subtitle tool.
Before You Start
What you need
- An audio or video file. For the first test, use a short sample instead of a full-length recording.
- A target subtitle format: SRT or VTT.
- The main spoken language and a short list of important names, product terms, or specialist vocabulary.
- A VMAI account and enough Credits for generation.
When should you use this tool?
| Situation | Why it helps |
|---|---|
| You need subtitles for a lecture or webinar | Turn speech into an editable subtitle file before human review. |
| You are preparing short-form captions | Get a fast SRT/VTT draft from a short audio or video clip. |
| You need source subtitles before translation | Create a timed original subtitle file before sending it to translation. |
| You need to revise a subtitle file | Import an existing SRT/VTT file and edit text or timing. |
Step 1: Open Subtitle Generator
Open VMAI Subtitle Generator.
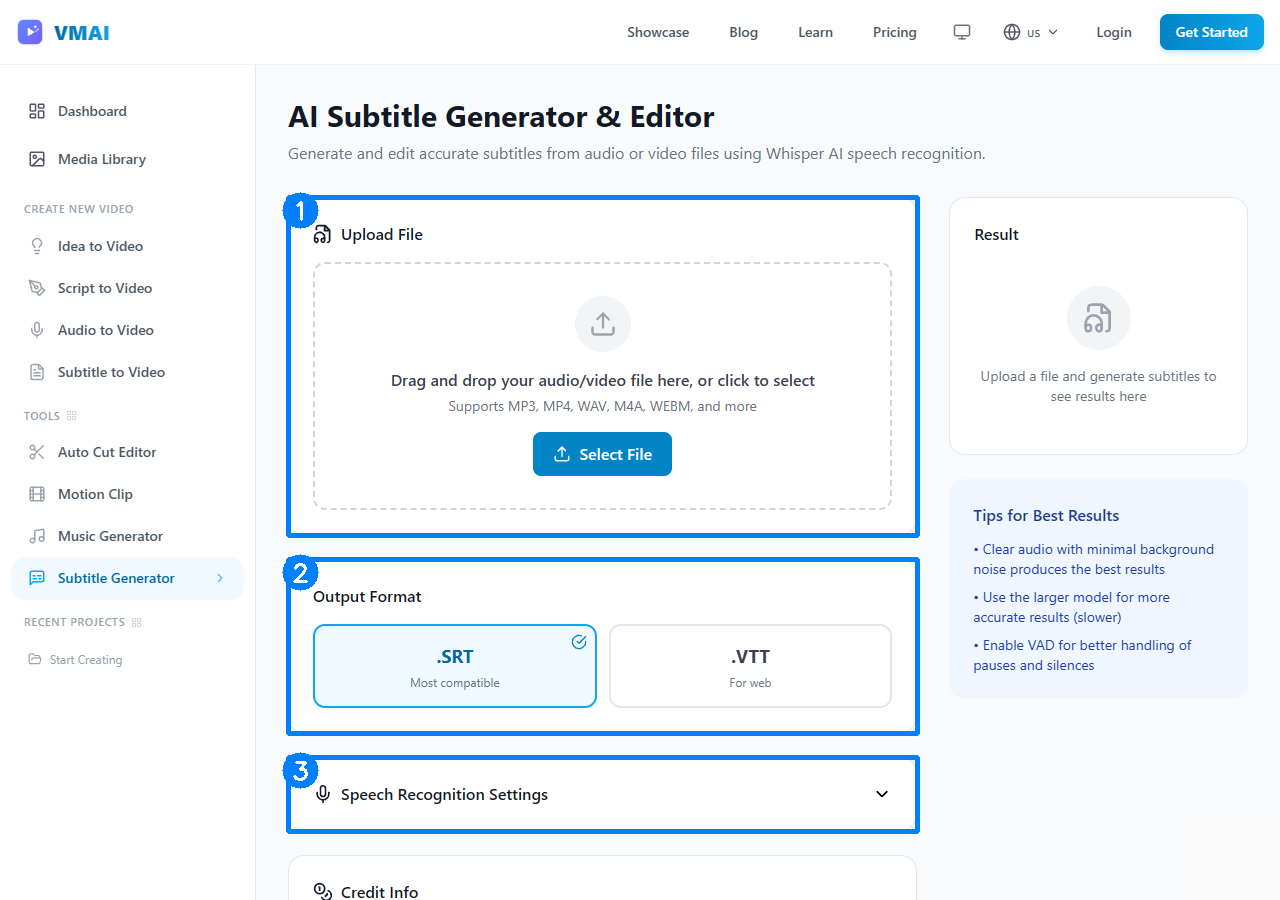
VMAI Subtitle Generator screen: start with 1) file upload, 2) SRT/VTT output format, and 3) speech recognition settings.
The page has four practical areas.
| Area | What It Does |
|---|---|
| File upload | Select or drag in an audio/video file. Existing SRT/VTT files can be opened for editing. |
| Output format | Choose SRT or VTT. |
| Speech recognition settings | Adjust language, VAD, AI subtitle refinement, and subtitle splitting rules. |
| Result panel | Shows download, editing, and follow-up actions after generation. |
Start with a short sample if this is your first run. It is easier to tune settings on a small file than on a long recording.
Step 2: Upload a file
Click the upload area or drag a file into it. The current UI accepts audio/video files for subtitle generation, and .srt or .vtt files for editing.
Before uploading, check:
- Is the speech clear enough above background noise?
- Is the speaker volume too low compared with music?
- Are multiple speakers talking over each other?
- If the file is long, can you test a 30–60 second sample first?
After selection, the page shows the file name and, when available, an estimate based on duration. If a file-size or plan limit applies, the page can warn you before generation.
Step 3: Choose SRT or VTT
Choose the output format before generation.
| Format | Best fit |
|---|---|
| SRT | Broad compatibility with video editors, upload platforms, and subtitle-burning workflows. |
| VTT | Web playback or web-focused subtitle delivery. |
If you are unsure, start with SRT. It is a straightforward default for follow-up workflows such as Subtitle Translator and Subtitle Burner.
Step 4: Review speech recognition settings
Open Speech Recognition Settings to adjust the options that affect the result.
Recognition language
The default is auto detect. If the spoken language is clear, selecting it directly can make the first draft more consistent. For example, choose Korean for a Korean tutorial or English for an English interview.
Voice Activity Detection (VAD)
VAD helps separate speech regions. Check it when the recording includes pauses, silence, or background noise. A stricter setting may ignore noise but miss softer speech; a looser setting may keep more audio but include more noise. Start with the default and adjust after reviewing the result.
AI subtitle refinement and context
AI subtitle refinement helps clean punctuation and recognition errors. If product terms or specialist vocabulary matter, add a short note in the Context field.
Example:
textTutorial about using VMAI Subtitle Generator. Frequent terms: SRT, VTT, Credits, Subtitle Burner.
Subtitle formatting
Use maximum duration, maximum characters, and minimum characters to avoid lines that are too long or too fragmented. The defaults are good for testing, but review them for mobile videos, lectures, and screen recordings where subtitles can cover important visuals.
Step 5: Check Credits and generate
Before you generate, review the Credit information area.
Check:
- available Credits;
- the per-minute Credit rate for the selected recognition settings;
- estimated total Credits based on file length;
- additional Credits when AI subtitle refinement is enabled.
For long files, do not start with the full recording. Generate a short sample first, confirm the language, VAD, context, and line length, then process the full file once the settings look stable.
When ready, click Generate Subtitles. The page shows progress while generation runs.
Step 6: Edit the result
After generation, the result panel lets you download the subtitle file and open the editor to review text and timing.
In the editor, check:
- Are important words being recognized correctly?
- Does punctuation match the tone of the video?
- Do start and end times match the speech?
- Are any subtitles too short or too long?
- Do subtitles cover important UI or visual details?
The editor supports subtitle text, start/end time changes, adding and deleting entries, merging and splitting, and find/replace. If you import an existing SRT/VTT file, you can use the same editing flow.
Step 7: Download and continue
After review, download the subtitle file. Keep these notes with the project:
- original audio/video file name;
- generated subtitle format, SRT or VTT;
- recognition language and important settings;
- specialist terms you corrected;
- final downloaded file name.
Choose the next workflow based on your goal.
| Next task | Tool |
|---|---|
| Translate the subtitles | Subtitle Translator |
| Burn subtitles into a video | Subtitle Burner |
| Create a new video from subtitles | Create New Video |
Checklist
Before and after generation, confirm:
- SRT/VTT was chosen based on the final publishing workflow.
- The main language and auto-detect setting were reviewed.
- VAD handles pauses and silence naturally.
- AI subtitle refinement has the context and key terms it needs.
- Subtitle length and character limits were reviewed on the actual video layout.
- Credits were checked, and long files were tested with a short sample first.
- The result was downloaded, and important settings were saved with the project.
Troubleshooting
The Generate Subtitles button is disabled
Check that a file is selected, that you are signed in, and that you have enough Credits. Actual generation is available only to authenticated users.
The subtitle timing feels wrong
Adjust VAD sensitivity and maximum subtitle duration. Background noise or overlapping speakers can make segmentation less stable.
Specialist terms are repeatedly wrong
Add product names and vocabulary to the context field and test again. After generation, use find/replace in the editor to clean repeated mistakes.
Subtitles are too long on screen
Lower the maximum characters per subtitle and split long entries in the editor. For mobile-first videos, review against a smaller screen than your desktop preview.
Next step
Once the source subtitle file is ready, continue with translation or styling. Use Translate SRT and VTT Subtitle Files for multilingual subtitles, or read 7 Checks Before You Choose a Subtitle Style before burning subtitles into the video.
Tutorial Complete!
You've read this tutorial. Move on to the next step.
Found this tutorial helpful?
Subscribe to get notified when we publish new tutorials and guides. No spam, unsubscribe anytime.
Comments
Please login to leave a comment
LoginNo comments yet. Be the first to comment!